The printing of pictures employed a 350-year-old engraving technology based on a process in which lines and dots were incised into a metal sheet.
Basic Technology
At the opening of the 19th century, the printing of pictures still employed a 350-year-old technology based on a process called intaglio—from an Italian word meaning to “cut in”—in which lines and dots were incised into a metal sheet called a plate. Ink was brushed over the entire plate and then wiped off, leaving ink in the incisions; a sheet of paper was placed over the plate, and sufficient pressure was applied to transfer the ink from the plate to the paper. At first, sheets of iron, zinc, and steel were used for plate-making, but by the middle of the 18th century copper was preferred because it was comparatively light in weight, soft enough to hold minute details, yet hard enough to last for a reasonable number of impressions.
The two basic techniques for producing an intaglio image were engraving and etching. Engraving used hand-held cutting tools, including the burin (“boring-tool”) or graver, and the roulette, a small wheel covered with sharp points. An etching—from a Teutonic verb meaning “to eat”—was produced by coating the plate with a thin ground of wax, then cutting through it into the plate with a needle. The plate was drenched with aqua fortis (nitric acid), which ate into the copper wherever the ground had been removed. The plate was then rinsed, and the ground was scraped off.
A continuous range of tones between white and near-black could be produced by the appropriate spacing of the lines or dots—the closer together, the darker the shade. Both engraving and etching techniques could be applied to the same plate.
Examples of two of the numerous black-and-white engravings used in Discovering Lewis & Clark will be found at Illustrating the Great Fall, engraved from a drawing by John James Barralet; “Clark’s Map” in Mapping the Great Falls, and Charles-Alexandre Lesueur‘s White-tailed Deer, and “Common or Fallow Deer.”
An Engraver’s Workshop
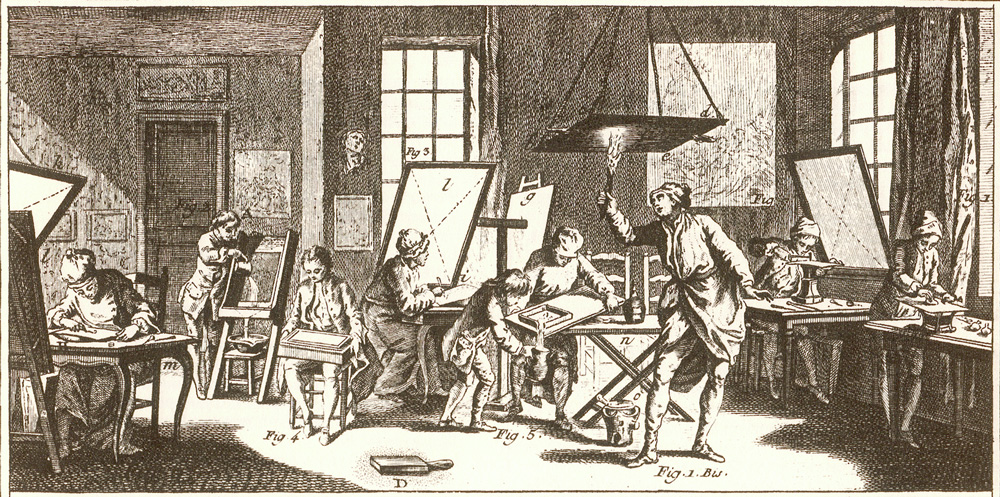
The scene above[1]This and the other illustrations in this section are from L’Encyclopédie de Diderot et d’Alembert (40 vols., Paris: Inter-Libres, 2001-2002), vol. 21, Gravure en Taille-douce … Continue reading depicts some of the steps performed by an engraver’s assistants and apprentices in creating copperplate copies of drawings or paintings for printing. The man standing at right of center is blackening one side of a large copper plate with a smoky torch to make the engravers’ lines more readily visible; the blackened plate will then be cut into sizes suitable for printing—approximately 5 by 7 inches for the standard book size, termed octavo. The blacking will be cleaned off before printing. The man and boy he is facing are pouring off acid that has etched parts of an image through the ground into the copper.
The woman seated at center is using a needle-pointed tool (we can tell by the way she holds it) to incise lines or dots that will reproduce certain details of the drawing or painting (g) she is copying (i). She views the painting through a chassis, a framed sheet of paper (l) made transparent by an application of oil or varnish. The triangles on the chassis serve as reference points in the copying process.
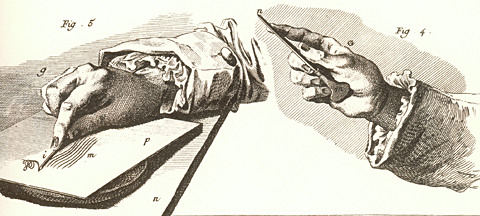
The man behind her monitors the acid’s effect on a copper plate. When he decides it’s done, he passes the plate to the man at his right, who rinses away the acid to halt the etching. At extreme left, an assistant engraves the key image, including its outline and principal details, on the copperplate. She holds the burin (see below, Fig. 4, 5) in one hand so as to control the depth of the cut, while turns the copperplate with the other hand to control the direction of each cut. The young men at extreme right (Fig. 1, 7) are making final touch-ups on two plates. The chassis propped at the window by the second man diffuses the daylight and reduces glare from the plate. On the floor in center foreground is a stone for sharpening burins and needles.
A proof must be pulled and read from each plate after each step; necessary revisions must be made before the plate is passed on to the next station. As the final step, lettering is etched in with special tools—in reverse, since the printing press exchanges left for right from the plate. Erasures are impossible, so accuracy and precision are imperative. Besides technical expertise and experience, each person in the engraver’s shop must have some measure of artistic perception and talent. The final printed image will bear the name of the artist as well as that of the engraver, but ultimately the printed plate will reflect the overall quality of the teamwork involved.
The manner of holding and controlling a burin or graver. The copper plate rests on a small turntable.
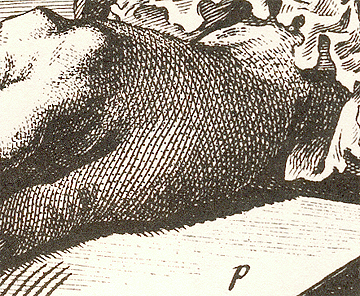
Cross-hatching combined with mezzotint gives a realistic shape and lighting to a worker’s hand.
Hand-colored Engraving
Until after 1850 the only way to produce a printed image in color was by applying watercolor paints after the printing, and before the book was bound. For many people, hand-colored engravings represented “the gold standard of natural history illustration.”[2]Meriwether Lewis was not an engraver, but he certainly knew how to use cross-hatching to create the illusion of a third dimension, as he demonstrated in his remarkable drawing of a fish called a … Continue reading The first hand-colored engravings of flora appeared in Europe during the Linnaean era, around 1750. The first of Lewis and Clark’s discoveries to appear in color were Alexander Wilson‘s drawings of the Western tanager, Lewis’s woodpecker, and Clark’s nutcracker, which were engraved by Alexander Lawson for Wilson’s American Ornithology in 1808. Next came Frederick Pursh‘s Flora Americae Septentrionalis of 1813.
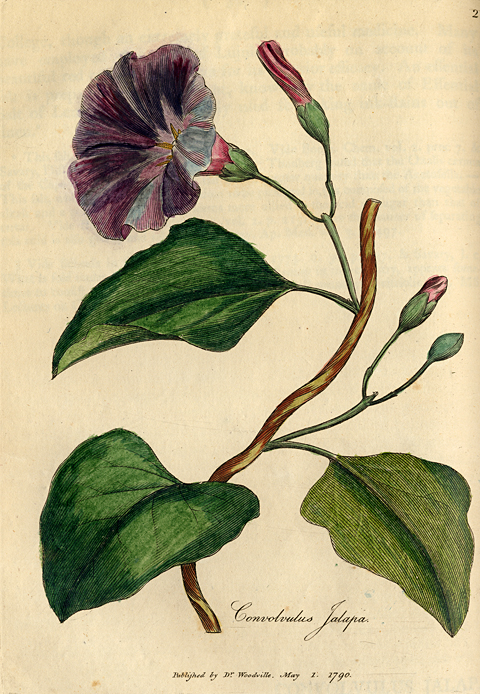
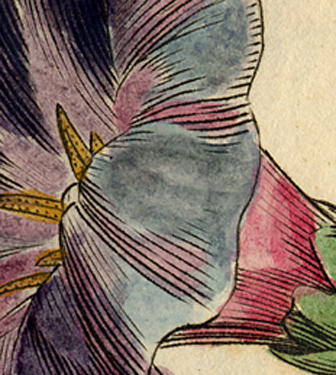
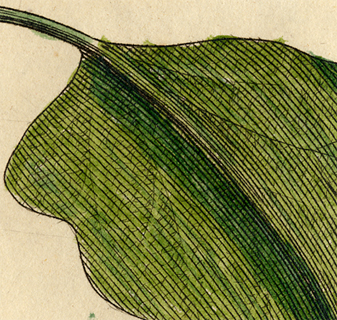
This hand-colored engraving of the jalap vine (Convolvulus jalapa, or Exogonium purga, also known as Ipomoea jalapa) is from one of the late-18th-century books on materia medica.[3]James N. Green, “Hand Coloring vs. Color Printing in Early Nineteenth Century Natural History Color-Plate Books.” Work in progress. James Green is Librarian at the Library Company of … Continue reading The image here is approximately the size of the copperplate on which it was engraved.
Two different instruments were used to make the original engraving. The varying widths of the lines correspond to their different depths. Painting a printed engraving at such a small scale required keen eyesight and a steady hand. The slight inaccuracies in brushwork that are obvious in this enlarged detail are invisible in the full image.
Each printed plate had to be colored separately. For maximum efficiency and economy, several different craftsmen were hired to work under the supervision of the artist. Qualities of the paints, including their richness and stability, as well as the absorptive characteristics of the paper used, affected the outcomes. The greatest challenge was to achieve consistency in hues and saturations of the respective colors from one copy to the next. For that reason some botanists preferred black-and-white engravings, which clearly showed a plant’s structural details without the potentially misleading effects of colors.[4]William Woodville (1752-1805), Medical Botany, containing systematic and general descriptions, with plates of all the medicinal plants, indigenous and exotic, comprehended in the catalogues of … Continue reading
Among the examples of hand-colored engravings used in Discovering Lewis & Clark are Bitterroot, Lewisia rediviva, and elkhorn, Clarkia pulchella.
Black-and-white and colored engravings were the means through which the plants and animals that Lewis and Clark observed were first published for the rest of the world to see. By the 1830s a major innovation in printing technology would significantly enhance the public’s appreciation of the beauty and excitement in the flora and fauna, as well as the scenic grandeur, of the corridor the explorers traced through the Northwest—lithography.
But first, during the decade before and the one after the turn of the 19th century, there occurred a techno-art interlude.
Notes
| ↑1 | This and the other illustrations in this section are from L’Encyclopédie de Diderot et d’Alembert (40 vols., Paris: Inter-Libres, 2001-2002), vol. 21, Gravure en Taille-douce [Copperplate Engraving], Plates 1, 3, 7, and 8. The author is indebted to William Gamradt, artist and engraver, for his advice and assistance. His own work may viewed at http://www.gamradtgallery.com/. |
|---|---|
| ↑2 | Meriwether Lewis was not an engraver, but he certainly knew how to use cross-hatching to create the illusion of a third dimension, as he demonstrated in his remarkable drawing of a fish called a eulachon. |
| ↑3 | James N. Green, “Hand Coloring vs. Color Printing in Early Nineteenth Century Natural History Color-Plate Books.” Work in progress. James Green is Librarian at the Library Company of Philadelphia. |
| ↑4 | William Woodville (1752-1805), Medical Botany, containing systematic and general descriptions, with plates of all the medicinal plants, indigenous and exotic, comprehended in the catalogues of materia medica, . . . 3 vols. (London, 1790-1793). Jalap was one of the two purgatives constituting Dr. Benjamin Rush‘s famous pills; the other was calomel, or mercurous chloride. |
Experience the Lewis and Clark Trail
The Lewis and Clark Trail Experience—our sister site at lewisandclark.travel—connects the world to people and places on the Lewis and Clark Trail.
Discover More
- The Lewis and Clark Expedition: Day by Day by Gary E. Moulton (University of Nebraska Press, 2018). The story in prose, 14 May 1804–23 September 1806.
- The Lewis and Clark Journals: An American Epic of Discovery (abridged) by Gary E. Moulton (University of Nebraska Press, 2003). Selected journal excerpts, 14 May 1804–23 September 1806.
- The Lewis and Clark Journals. by Gary E. Moulton (University of Nebraska Press, 1983–2001). The complete story in 13 volumes.
